The ribbon Classic packing knot has ten loops and can be made from any wire-free ribbon. It's easiest to start with single grosses because you can see if the loops are done correctly!
The size of the operation difficulty senior: 10 cm
Please be prepared:
✧1.4m long, 22mm or 25mm wide single side faille or satin
✧ Crayon, lighter or lock fluid (optional)
✧ water-soluble marker
✧4 long beads
✧ applies to the surface of a needle, such as an ironing board or layers of felt
✧ duckbill clip
✧ stitches
✧ suture, double strand and knot at end
✧ scissors
1. If necessary, edge one end of the ribbon and make a mark 15cm from this end.
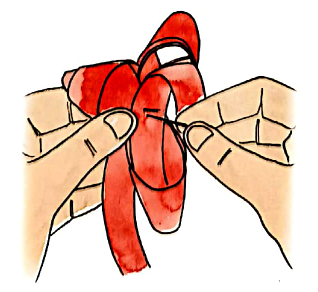
2. Insert 3 beads into the felt or ironing board to form an equilateral triangle with each side measuring 9cm. Make the connecting lines of 2 pins parallel to the bottom of the working plane and the third pin inserted at the top to form a tip.
3. Find the mark you just made on the ribbon and place the mark with the bead needle on top, with the ribbon face up. Insert a fourth pin from the end of the ribbon to hold the tail -- the pin will not be used in looping the ribbon.
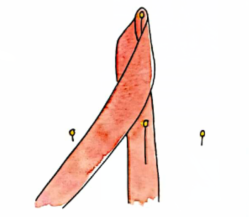
4. Loop the ribbon from left to right around the top needle so that the ribbon is facing the left needle. Do not twist the ribbon during the loop.
5. Place one finger in the middle of the triangle formed by the needle and loop the ribbon from bottom to bottom around the left needle so that the tail of the ribbon points to the right and secure it with your finger.
6. Loop the ribbon from top to bottom around the needle on the right, with its tail facing the needle on the top.
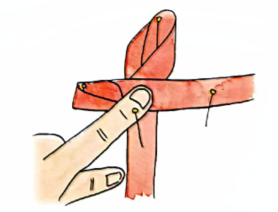
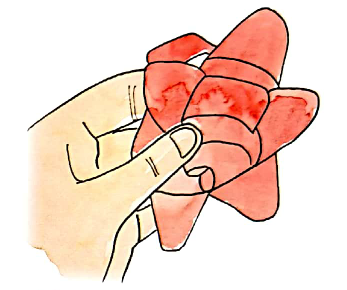
7, clip the clip in the middle to secure the three rings. Repeat steps 4 to 6 twice more, with three rings on each needle. The bottom of the knot is up.
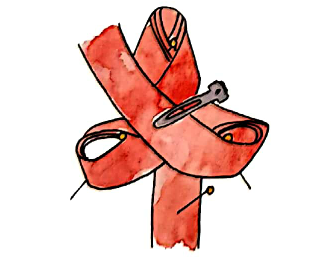
8. To be careful not to disturb the tied loop, remove the first bead at the end and hold the knot in one hand while holding the needle through the center of the knot with the other hand, making sure each layer is threaded with a needle and thread.
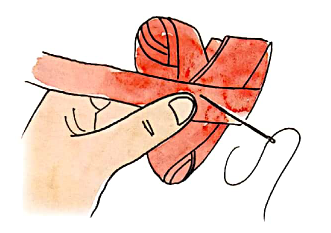
9. Turn the knot upside down and sew a small pin in the center to allow the loop to turn easily. Leave out the ribbon tail.
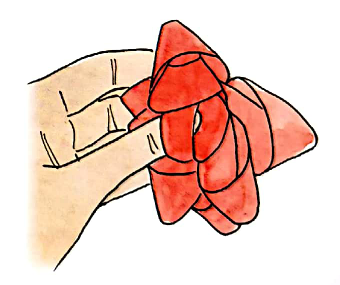
10. Tighten the thread and rotate each ring around the stitch until the packing knot is symmetrical.
11. Tie the end of the knot into a loop and sew it in the center of the front side of the packing knot. Tie the end of the thread securely from the back side.
12. Trim the remaining end of the ribbon on the back and seal the edge as needed.
Use 16mm wide ribbon and place 3 pins 8cm apart. If you want to make more knots, use wood and 3 equally spaced sticks instead of beads.
Post time: Jun-15-2022